Some counselors join CounSol.com already having a long list of current clients. The Bulk Client Info Import feature allows you to fill a custom template with all your clients to generate an account for each client (up to 199 per upload) simultaneously.
How to import a list of clients to create individual accounts for multiple clients simultaneously:
1. Select the Clients icon, then click the Import tab.

2. Click the Create Import List button. (If you already have a list of clients and their details, still click this button to generate a .CSV template and/or ensure your import list is formatted correctly).

3. Displayed is a list of info fields available in Counsol.com Client profiles. Check the box next to each item you already have in your records and want to include in your Client info import list.
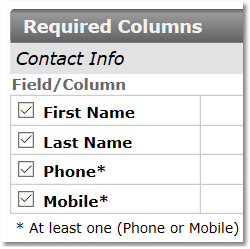
Note: You must have a First and Last name, and a contact number (either phone or mobile) to register a client.
Tip: If you want a client to receive a welcome email, providing them with a username and temporary password and inviting them to log in to the client portal, you must include an email for the client. If you do not want the client to receive the welcome email, leave the email field blank for that client.
Tip: Enable the After login require complete contact info feature in your Edit Practice Details page to ensure that all clients are prompted to fill in any missing contact information when they first log in.
4. When you have checked all fields you want included, generate a template by clicking the Download CSV Template button at the bottom of the page.

5. Open the template using Excel (or other spreadsheet editor). Copy your clients’ information into those fields and save as a .CSV file.
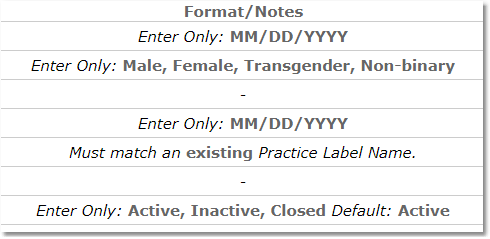
Note: Make sure the info you enter in the template fields follow the Format/Notes provided on the template generation page.
6. Return to the New Client Import page. And click the Choose File button under Select Completed Client Import List (.CSV File). Find and select your complete list.
Note: The import file must be in .CSV format and have no more than 200 rows. If you have more than 200 rows (199 clients) please divide your list into 2 or more files and upload them separately.

7. Select a Label from the drop-down menu for the entire list of clients being uploaded. (OPTIONAL)
Tip: If you want to add multiple labels within your client list, separate your clients by label and save each label group in their own list. Then upload each list and attribute the appropriate label to the group.

8. Click the green Upload button.
