Setting default notifications for the practice automatically sets the notifications preferences for each new client registered.
ON THIS PAGE:
•How to Enable or Disable default notifications for new clients
•How to Bulk Change client notification preferences for existing clients
How to enable or disable default notifications for new clients:
Note: Changes made here will only apply to new clients, not existing clients in the system. For instructions on changing notifications for a specific client Click Here.
1. Click on the Settings icon and then click on the Practice Settings tab.

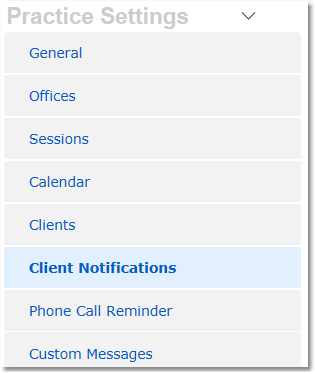
2. Select Client Notifications from the menu options on the left.

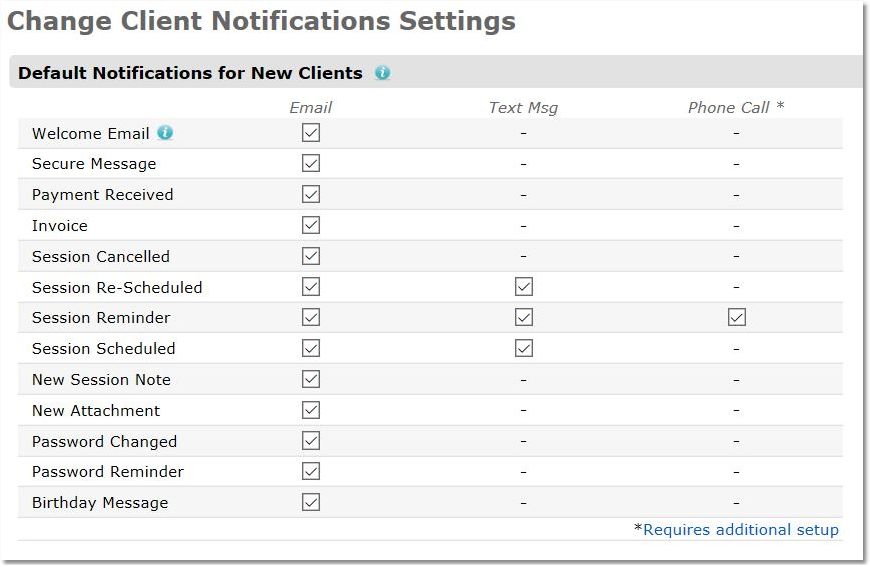
3. At the top is Default Notifications for New Clients. Enable/Disable client notifications as is appropriate.
Note: CounSol.com recommends leaving all notifications enabled at the start to ensure accountability and optimal, consistent communication with clients.

Checked Box = Enabled
Un-Checked Box = Disabled
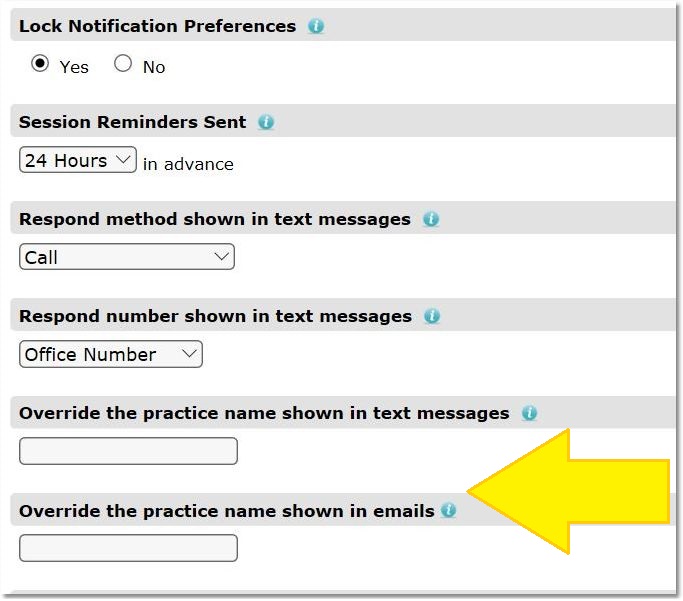
4. Enable/Disable clients' ability to modify their notification settings by choosing Yes or No below Lock Notification Preferences under Default Notifications for New Clients.

Note: CounSol.com recommends locking your notification preferences to require clients contact you if they do not want to receive certain notifications to ensure accountability and optimal, consistent communication with clients.
5. Optional - Override the practice name shown in text message and email notifications (for client privacy) by adding a custom name in either/both of the override practice name fields.
Tip: By default, your notifications will display the name you have listed in the Practice Name field. Clients may prefer email subjects and text messages (which often display on the screen of personal devices) not contain terms like "counseling", "therapy", etc..

6. Make the desired changes and click the Save Settings button.

How to Bulk Change client notification preferences for existing clients:
1. Click on the Settings icon and then click on the Practice Settings tab.

2. Select Client Notifications from the menu options on the left.

3. Click the blue Bulk Change Existing Client Notification Preferences link at the bottom of the notifications list.
4. Choose a notification Type to work with from the drop-down.
Note: You can only bulk change one notification preference item at a time
5. Select from Status and Label filters as needed (to bulk change ALL clients, choose "Any Status" and "All Labels").
6. Use the radio buttons to select the change you would like to make to each area listed. Confirm the change by typing "YES" (in CAPS) in the confirmation box, then click the green Process Bulk Change button. Repeat for all notification types as needed.