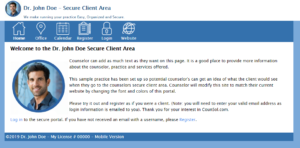
Our therapy practice management software has over 22 features that are sure to help you run a more efficient practice. Here are the five steps to getting started.
Step 1: Get Started With A Practice Management Plan
We allow you to test our therapy practice management software for 14 days free of charge. From there, we have four plans designed to meet the needs of counselors of all different calibers.
Our Standard plan is best for practices that do not accept insurance and starts at $49.95/month. Our Standard Plus plan is best for private practices that do accept insurance and starts at $59.95/month. Our Premium plan offers online video and chat sessions, but doesn’t accept insurance and starts at $64.95/month. Lastly, the Premium Plus plan accepts insurance and also offers online video and chat sessions for $69.95/month.
You also have the option to add counselors to your plan for an additional monthly fee. You can compare plan features here.
Step 2: Meet Your Personal Account Manager
One of the very things that makes us so unique is our active customer service. We value each and every one of our clients and take great pride in our personalized form of two-way communication.
Each account is assigned to one account manager, who serves as your go-to resource from the very beginning. This account manager will make an effort to get to know you, your practice, your needs and will play an active role as your main contact throughout your membership with us.
Step 3: Customize Your Client Site

Our therapy practice management software allows you to create a custom site that matches your current website. We provide tools that allow you to choose fonts, color and add images. This way, the site feels familiar to both you and your clients, making it an easier adjustment from the get-go.
After your site matches your brand, you’ll want to set up the calendar to fit your schedule and begin integrating important documents that you want to store in our system. Depending on the plan you choose, you’ll also have the opportunity to set up client billing and invoicing within CounSol.com using a processor we’ve partnered with.
Step 4: Integrate Client Information
We make it easy to insert new client data, client records, notes, and treatment plans. This private information is safely stored in your admin and can be organized per client to reference for future appointments.
We also offer the ability to create your own optional and required client forms, practice terms, questionnaires and policy agreements to be filled out online. All forms can be customized by types of questions and answer methods to assist you in gathering the most relevant information.
Step 5: Share The Link To Invite Clients
Once your clients click the link, they’re directed to the secure client portal. From there, they can view their private emails from you, schedule appointments based on your calendar, view and pay bills, and write in their private journal. The client portal is also where online video and chat sessions will live, if applicable to your plan.
Our therapy practice management software can do it all. Are you interested in giving it a go? Sign up for a free trial or contact us with any questions!


